
The 7-Day Writing Lesson Plan Perfect for Awkward Calendar Gaps
Every English teacher has faced those awkward 5–7 days that don’t fit neatly into their semester plan. Too short for a novel unit, too long for busy work, and you’re scrambling for something meaningful that won’t require weeks of prep.
When we were in the classroom, we wasted far too many hours creating one-off activities to fill those gaps—sometimes meaningfully, sometimes not—only to abandon them the next year when we no longer needed them. What we realized, however, is that a writing lesson plan can be the perfect solution for those too-small-but-too-big gaps.
Narrative essays, in particular, make great “between-unit” material because they aren’t tied to specific texts and students actually enjoy them. But after years of assigning forgettable prompts about “times you showed courage,” both we and our students were exhausted by the same tired topics.
This creative writing lesson plan solved both problems for us. Instead of another clichéd prompt, we asked students to write a story that incorporated an image of a sign banning goldfish from the cafeteria—what a realm of possibilities that opened up! Students got genuinely excited about their stories, and we actually enjoyed reading them. Plus, it wasn’t just fun—the mini-lessons on dialogue and sensory details genuinely improved their writing skills without feeling like another academic essay.
Even better, because the prompt isn’t tied to a specific text or unit, this lesson plan can fit anywhere in your calendar—perfect for filling those awkward gaps or serving as your standard narrative writing unit.
Your 7-Day Creative Writing Lesson Plan
The outline we’re sharing here is flexible: it can work in any middle or high school English classroom and can be easily adapted for a substitute teacher.
Optional Introduction
We taught this unit immediately after reviewing plot, character, and point of view as part of a short story unit. If you’re not confident that your students are familiar with these terms, you might consider starting with a review. We recommend including plot diagrams (exposition, complications, climax, resolution), conflict, characterization, setting, and point of view (first, third-person limited, third-person omniscient).
Pixar shorts are a great way to introduce these devices and practice creating plot diagrams. Students in older grades might benefit from a quick review game.
Differentiation Alert! If you have more advanced students, consider introducing more advanced plot devices (e.g., foreshadowing, in media res, flashback, second-person point of view) to encourage experimentation with complex plot structures and viewpoints.
Day 1 — Introduce the Prompt & Prewriting
In our experience, a writing lesson plan that is too open-ended creates more problems than it solves. Students, especially struggling writers, spend days staring at a blank screen because they have no idea what to write.
Using an image as a prompt is a quick and easy way to give students a starting point while still providing ample room for freedom and creativity. While we’ve used a variety of images over the years (Norman Rockwell’s The Young Lady with the Shiner is a favorite), we settled on the image below.
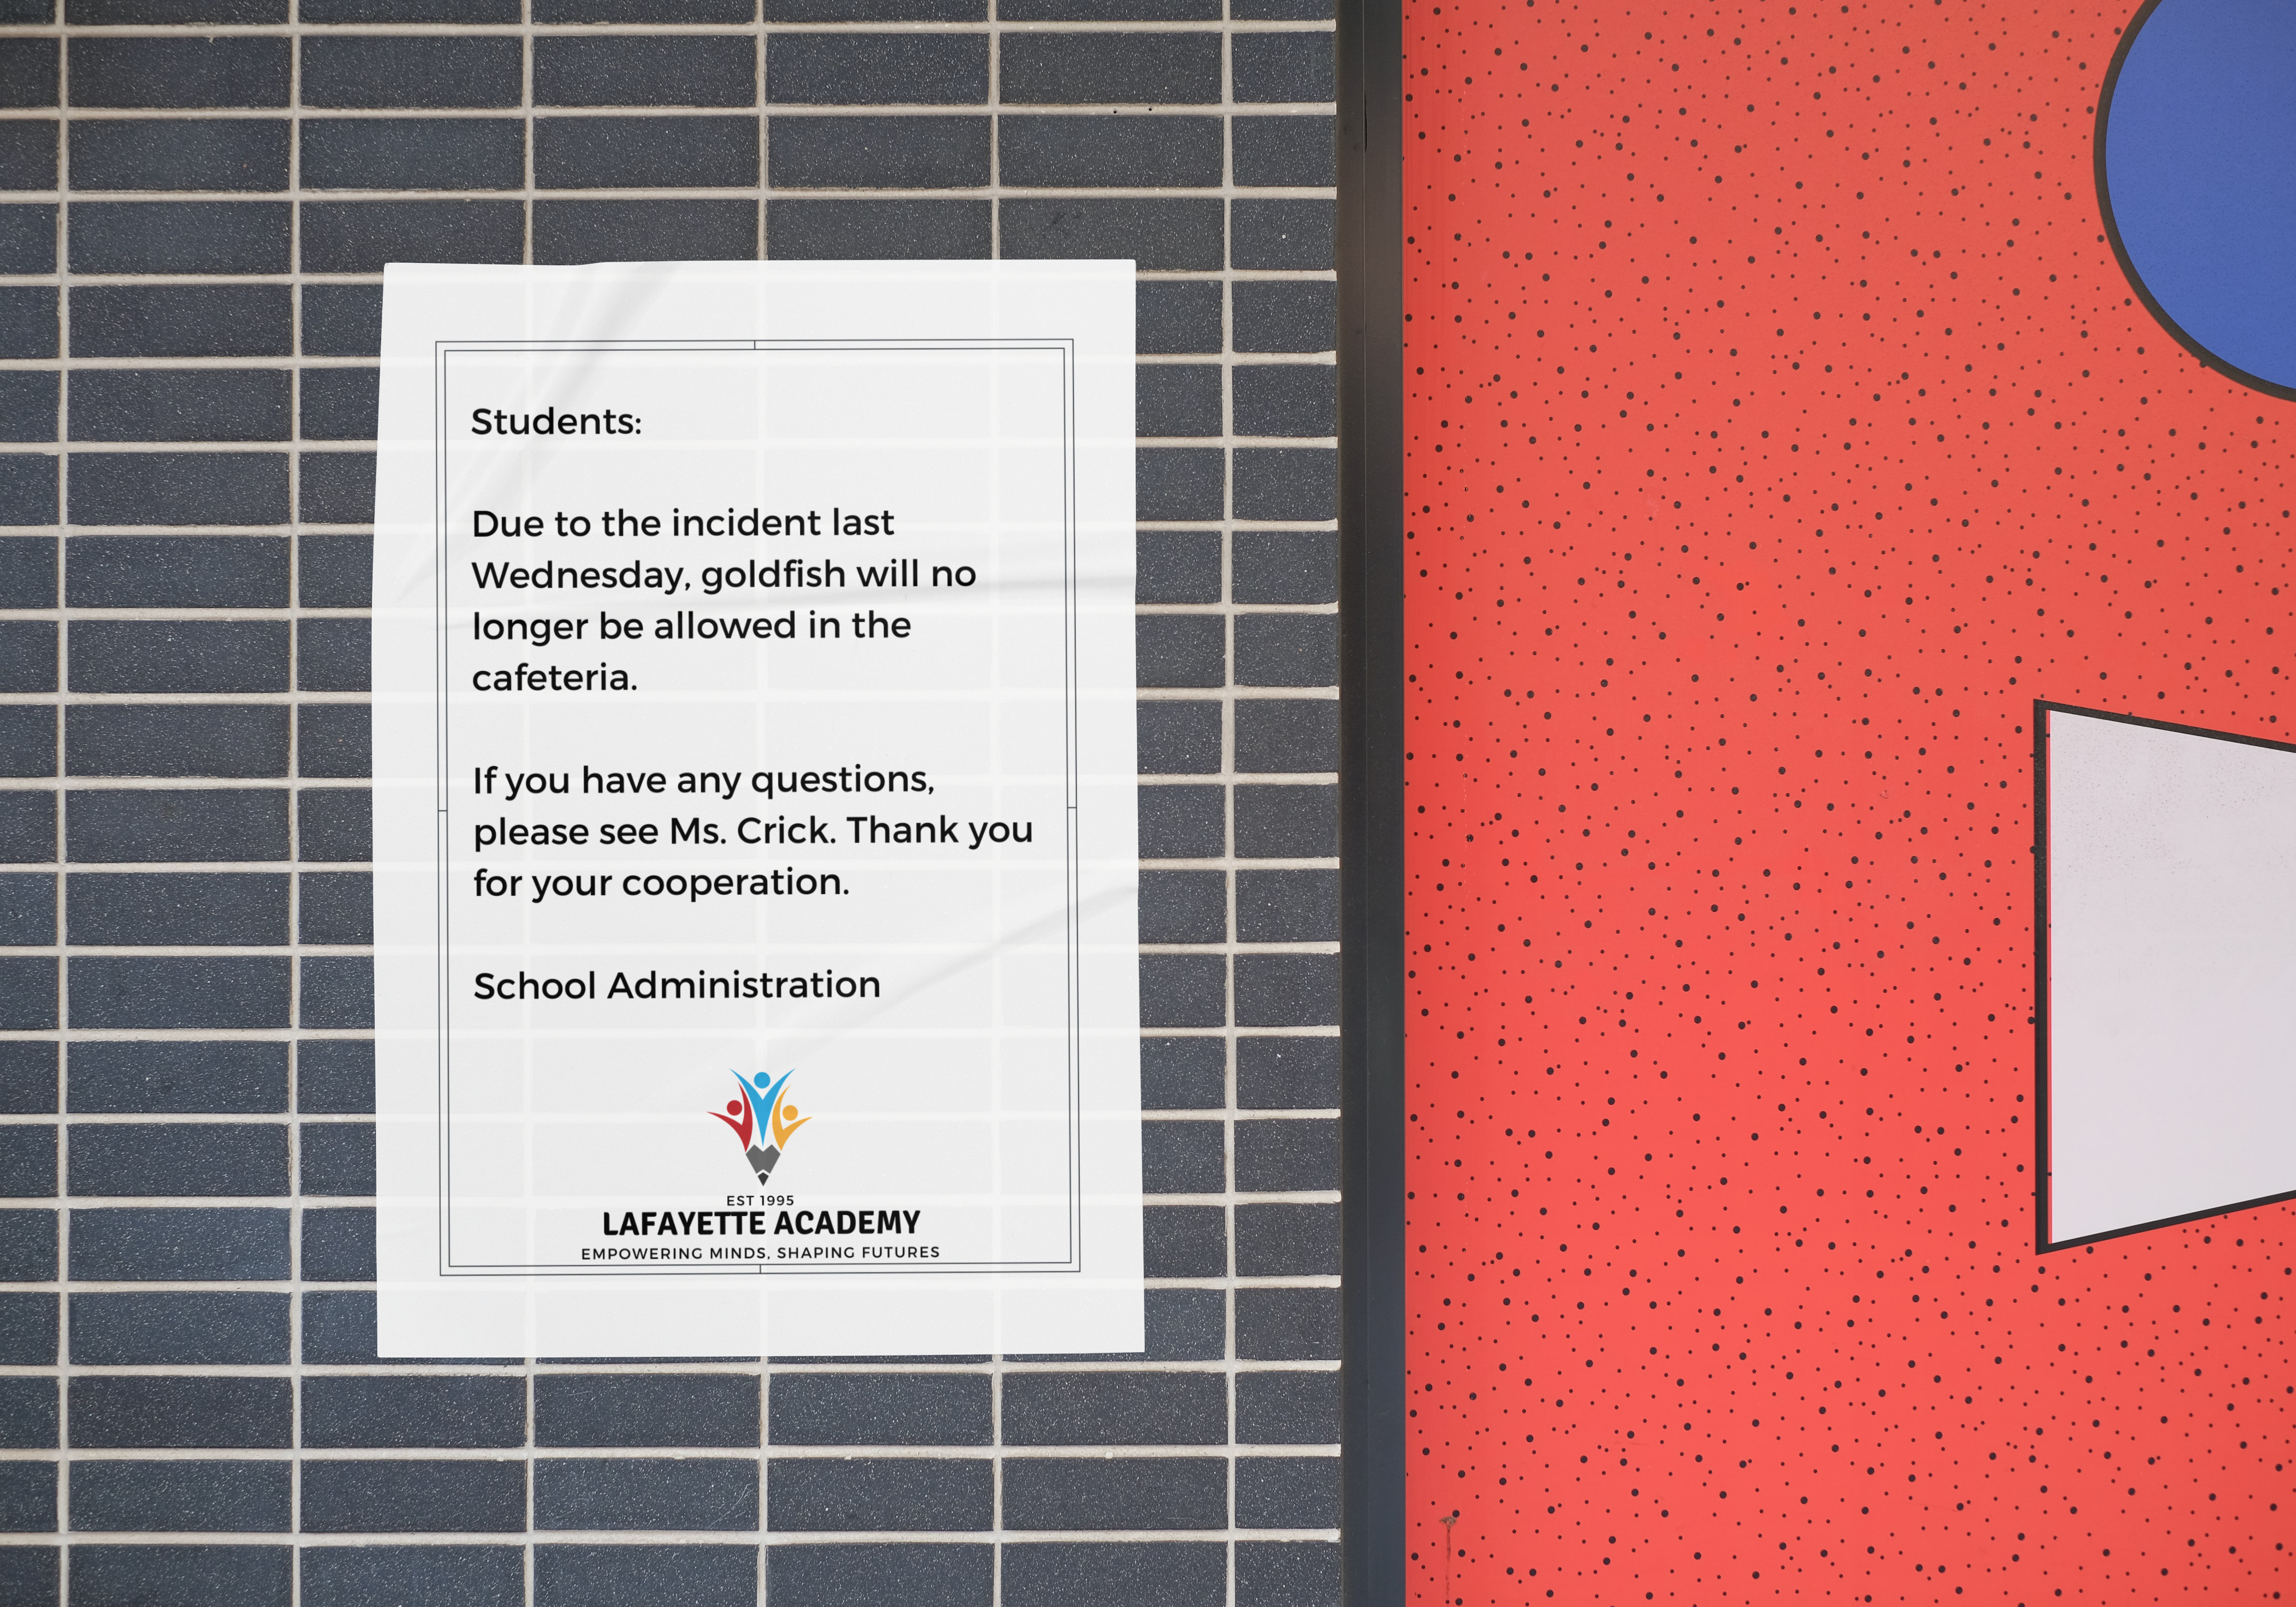
As you can imagine, students always had wild theories about what happened—everything from a prank gone wrong to a “bring your pets to school day” catastrophe to a food fight that started with goldfish crackers and devolved into the biggest mess the school had ever seen. We learned to let students brainstorm together first because their ideas got way more creative when they could bounce off each other.
After letting students’ imaginations run wild for a few minutes, we presented students with the prompt: “Using the image below as inspiration, write a short story that begins, passes through, or ends at this scene. This means that at some point in your story, you will have to address the sign posted on the wall.”
We provided a few additional requirements (length and required literary elements). One requirement we added in after a few years? No cliffhanger endings. While the cliffhanger is a valid method of storytelling, too many students simply wrote until they reached the page limit before tacking on, “To be continued . . .,” an approach that didn’t make for particularly compelling stories!
Finally, we had students decide on the basic elements they would include in their story. We separated the exposition into its own section, asking students to decide on their:
- Setting
- Protagonist
- Conflict
- 2–4 Additional Characters
- Point of View and Narrator
Then, we asked students to brainstorm three complications and the climax and resolution that would follow their exposition.
The review of the image and prompt took 15 minutes; students had the rest of the period to complete their brainstorming assignment.
Differentiation Alert! If you have more advanced students, consider using an intriguing excerpt from a novel or short story as a “prompt” that students must use somewhere in their story. As a bonus, this approach introduces students to a book they might enjoy!
Day 2 — Practice Writing Dialogue

Writing dialogue is a key skill in narrative writing (and we required students to use three pieces in their story), so we included a mini-lesson on dialogue before students began their rough draft.
Teaching students how to write dialogue has benefits beyond narrative writing: dialogue is punctuated in similar ways to textual evidence, so the time spent here will also improve your students’ academic writing.
We began our mini-lesson by showing the Walt Disney Animation short film “Paperman” (about 7 minutes). (Let us tell you: this was a much better choice than our first attempt—a still image of three people wearing headphones. Yes, that’s all they were doing. We got a lot of blank stares.)
After watching the short film once for the basic storyline, we played it again, and students assigned a name to each of the three characters (the “paperman,” the young woman, and the boss) and decided on an adjective to describe their personality and what their voice would sound like.
Then, we did a quick review of six rules related to punctuating dialogue:
- Any words a character says should be placed in quotation marks.
- Any time you change speakers, start a new paragraph.
- Dialogue tags must be set apart from the sentence with a comma.
- All punctuation (commas, exclamation points, question marks, periods) that punctuates what the person is saying goes inside the quotation marks.
- Any punctuation that is not part of the dialogue should be placed outside the quotation marks. If the dialogue ends the sentence, the end punctuation for what the speaker said is sufficient to end the sentence.
- Follow regular capitalization rules.
We also provided students with a list of dialogue tags to replace “said” and assigned students to write ten lines of dialogue (with dialogue tags/attributions) for “Paperman,” a task that can be done independently or with a partner, depending on what works best for your students.
If you have time, consider having students exchange dialogues to check for the use of the six rules above and vivid verbs in their dialogue tags.
Day 3 — Rough Drafting Begins
At this point, students are ready to begin their rough draft, following the outline they created in their prewriting.
This was the kind of day when we played quiet instrumental music to create a calm, peaceful mood as students wrote. While we did answer questions as they came up, we mostly left students to write uninterrupted.
This was always our favorite day because students were actually excited to write. We’d get questions like “Can my story be a flashback?” or “What if the goldfish are aliens?” We rarely saw this kind of engagement with traditional essay assignments.
We like to provide our students with structured outlines to guide them through the writing process, model academic language, and help them focus on the quality of their ideas. Creative writing, of course, doesn’t lend itself as well to a structured outline, so we had to modify our usual approach.
We provided our students with reminders of elements that should be included in each section (exposition, complications, climax, resolution) and approximately how long each section should be. As part of the reminders, we offered suggestions about where they might consider adding in their three pieces of dialogue or three sensory details.
Differentiation Alert! If your students don’t need suggestions as much as they need to remember to include all required elements, consider providing them with a checklist that they can mark off as they write.
Day 4 — Practice Using Sensory Details

Another key skill in narrative writing is the ability to incorporate sensory details that allow the reader to experience the story. While characteristic of narrative writing, the focus on precision, description, and showing rather than telling reinforces skills that transfer to a wide variety of writing types.
After a few boring years of asking our students to describe the experience of sitting in the classroom or their favorite holiday memory (options that still work if you’re using this writing lesson plan with a sub), we decided to provide our students with an experience to describe that was quick, inexpensive, and mess-free.
We started with Tang powder, but quickly learned that Pop Rocks were worth the extra dollar because students got genuinely excited about the “explosion” sensation. One year, a student described it as “tiny fireworks having a party on my tongue,” exactly the kind of vivid detail we wanted them to use in their stories.
After we distributed a small sample of Pop Rocks, students had to come up with three details for each type of imagery:
- visual (sight)
- olfactory (smell)
- tactile (touch)
- kinesthetic (movement)
- organic (internal sensation)
- gustatory (taste)
- auditory (sound)
Then, students wrote 2–3 sentences describing their experience eating Pop Rocks (using at least three sensory details) and 2–3 sentences describing their experience eating their favorite candy.
The activity only takes about 30 minutes, so if you have time, students can share their sentences in groups or with the full class, and the class can vote on the best description. If you have a lot of time, students could even vote bracket-style: each group votes for their favorite description, and then the whole class votes on the winners from each group.
Day 5 — Finish Rough Drafting
At this point, it’s helpful to give students another day to finish their rough drafts, ensuring that they incorporate three sensory details if they haven’t already.
If you need to get through the unit more quickly, this is something students can do at home. If you’re in class with your students, this might be a great day to check in with students individually or in small groups. Choose one element of writing to focus on (e.g., conflict, dialogue, sensory details, climax, etc.) to keep the check-in meetings manageable.
Day 6 — Peer Revision and Editing Day
We learned the hard way that asking students to “check for grammar errors” was useless. But asking them to circle dialogue punctuation marks, highlight sensory details, identify each of the required literary elements, or check that the first word of each sentence was capitalized? That they could do, and it actually helped.
We also learned to ask students to share one thing they liked about their peer’s paper. Writing is challenging, and we want our students to feel encouraged about what they did well, especially since many of their stories were quite entertaining!
Day 7 — Final Edits, Submission, and Reflection
If you only have one week to fill, the activities on the last day could be completed for homework.
We provided class time for students to make the revisions and edits recommended by their peers and set up their documents in MLA format before submitting their essays at the end of the class period.
If you have time, consider having students respond to a reflection question like “What’s one thing you’re proud of in this piece?” or “What’s one change you made from your rough draft to your final draft?” Questions like these help students think about what they have learned, identifying areas of growth and strategies that they can incorporate into future assignments.
Want It All in One Place?

After teaching this unit multiple times and refining it based on what actually worked (and what didn’t!), we assembled our Fictional Narrative Unit Plan with everything you need (well, everything but the Pop Rocks)—including the things we wish we’d had from the beginning. Beyond the daily assignments (print and digital versions), we included all those “extras” that make the difference: the Kahoot review game (because students love competition), the point of view bookmark (a lifesaver during conferences), and yes, even the rubric that actually assesses what matters in creative writing.
We also created a differentiated version using an excerpt from Mr. Penumbra’s 24-Hour Bookstore for teachers who want to challenge advanced students or prefer a literary prompt over the goldfish sign.
Everything you need for this 5–7 day unit is in this resource—no additional prep needed, no scrambling required!